
Round the Mountain
Tongariro National Park
9 - 13 January 2021
We decided to do a new years trip doing Round the Mountain which has been on our list to do for some time. Due to the summer great walks season Waihohonu Hut required booking in advance and this also determined that we did the circuit anti-clockwise direction. I was joined by Chris S, Staci, Nathalie, Cameron, Tim S and Kirsty.
COVID-19 Alert Level: 1
Ruapehu Volcanic Alert Level: 2 (lowered to level 1 during trip)
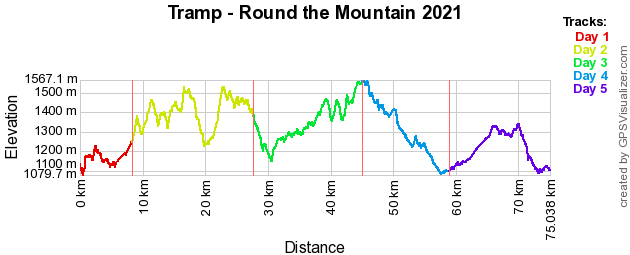
| Day 1 | Travel to Whakapapa Village Whakapapa Village - Whakapapiti Hut | 3 Hours 20 Mins 8.3 km |
| Day 2 | Whakapapaiti Hut - Blyth Hut | 13 Hours 10 Mins 19.4 km |
| Day 3 | Blyth Hut - Rangipo Hut via Mangaehuehu Hut | 10 Hours 30 Mins 17.4 km |
| Day 4 | Rangipo Hut - Waihohonu Hut | 6 Hours 40 Mins 13.8 km |
| Day 5 | Waihohonu Hut - Whakapapa Village | 5 Hours 30 Mins 16.1 km |
 (https://www.trampingnz.com/images/maps/round_the_mountain_2021.png)
We left Auckland at around 8.30am and proceeded to head south. First stop was at the BP station on the southern motorway for both cars to meet up and get the all important coffee fix. Next stop break was at Otorohanga for toilets and a small feed. Then we continued to National Park where we stopped at The Station Cafe at the railway station for lunch (very nice food). Afterwards continued on to Whakapapa Village.
Once arrived, we visited the DOC visitor centre (https://www.doc.govt.nz/parks-and-recreation/places-to-go/central-north-island/places/tongariro-national-park/tongariro-national-park-visitor-centre/) where we got hut tickets/passes and car parking permits. We drove up the road to the start of the track where we unloaded the cars and sorted out our packs. Then we took the cars to the designated parking area, and then walked back to where the rest of the group were at the start of the track.
Then we were off. Initially followed a well graded Silica Rapids loop track before turning off onto the track which will take us to tonights hut. The first part of the track was all in bush, which was quite nice before crossing a bridge to go up Whakapapaiti Valley. In the valley it was quite open all the way up, just following the route marker poles.
 (https://www.trampingnz.com/images/05_central_plateau/rtm21_whakapapaiti.jpg)
Looking up Whakapapaiti River | Photo Credit: Chris Foster
We had a major river crossing before we could reach the hut, which required to go over some big rocks to get to the water to cross. Once crossed the water, we decided that we would go for a swim in the cold river, which was refreshing, since it was quite a warm day. Then we headed up to the hut.
Arrived at the hut, we sorted out our beds, then we got dinner on and relaxed on the deck for the evening. After dinner and it started to get dark, we went inside and played cards. Just before we went to bed, we went outside and admired the amazing amount of stars in the sky.
Got up early to a stunning sunny morning as we had a big day ahead of us. Started before the sun began putting out the heat which involved going further up the valley before we could exit it across the other side. Today required going in and out of many valleys, which was quite hard work, especially with loose rocks. Stopped for breaks several times at either the top of the valley or at the bottom. There were some amazing views to be had.
During the day we kept monitoring our progress and ensure that everyone was hydrated as we were in the heat and directly in the sun with no clouds. Due to this, it was slowing down our progress.
 (https://www.trampingnz.com/images/05_central_plateau/rtm21_surprise.jpg)
Lake Surprise | Photo Credit: Chris Foster
By late afternoon we reached Magaturuturu Hut, where we stopped for a bit in the shade and re-evaluated our position. Due to summer/daylight saving we still had quite a fair bit of sunlight left, so we decided to push on to our intended destination. So we continued on, up the waterfall to Ohakune Mountain Road. Once reached we decided that we could still go off-track for a direct route to Blyth Hut, rather than going via road.
 (https://www.trampingnz.com/images/05_central_plateau/rtm21_waterfall.jpg)
Cascades Waterfall | Photo Credit: Chris Foster
So using GPS and mapping skills, we plodded our way to the hut. Some parts of the terrain was harder than expected. As time went on most of us were getting quite tired and cold as the cloud and wind came in. Finally we saw the poled route to the hut, but we had a bit of a problem, we were too low. So we managed to get through the last valley and up onto the ridge were the poles were. There was a lot of excitement when the hut came into view.
We finally reached the hut as the sun was about to start setting, with an amazing view. Dinner was cooked and we ate in darkness of the hut before going to bed after a huge 13 hour day.
[Note: As a re-evaluation of the route, we had determined that it would be easier in the opposite direction as there is more easily identifiable landmarks and possibly start at a bit higher (Turoa carpark) than we did (Massey University hut).]
Got up to an overcast morning, with cloud nearby, but that started burning off quite quickly. Today is another long day as we head to the highest hut on the track. Didn't start as early this morning but we still got away at a good time. First of all it was downhill through the bush to the main track, which took us track time (the first for the trip). Once back on the round the mountain track, there was a lot of board walks over swampy areas and a few bridges within the bush, which gave us good cover from the sun and allowed us to make good progress.
Then we were then back above the bush line where the sun was beating down on us. After going through some small valleys, we reached Mangaehuehu Hut. We stopped here for lunch in the shade of the hut's veranda.
Fortunately the first part after lunch we were in and out of the bush, which was good, but then it gave way to the volcanic desert landscape. Heading along this in the hot sun was quite hard work. At one point we had to stop and take a break. In and out of numerous valleys, some were not easy with moving rocks. Continued on until we reached one of the potential lahar valleys. It was downhill into the valley where had to be careful as the track was very narrow and rocks sliding. At the bottom crossed the river and climbed back up. A couple of the group did go for a quick dip in the river, which apparently was pretty cold. Just across a couple of more valleys before we reached the hut.
There was huge excitement in seeing the hut. Rangipo Hut, has an amazing view over Rangipo Desert and you can also see the Desert Road (State Highway 1). So we cooked dinner and again ate it in darkness. Then we all went to bed.
The long drop at this hut had quite a smell, so when we used it, we kept the door open with a rock. This allowed to use the "loo with a view", but the view was just of rocks.
Got up to another stunning hot sunny day. We left at a reasonable time, while it was still cool. Had to go through a valley which was full of loose rocks, which took quite a bit of time. Then the next valley we reached was the infamous lahar valley - Whangaehu. So we kept on going and not stopping between the no stopping signs. This valley has very interesting landscape as you are dwharfed by big rocks where you have to cross a bridge. We all crossed the valley safely.
 (https://www.trampingnz.com/images/05_central_plateau/rtm21_whangaehu.jpg)
Looking up Whangaehu River | Photo Credit: Chris Foster
Then we continued on along the desert landscape until we reached Tukino Mountain Road, which we crossed, before going into another valley. Going along the base of the valley opened up to views of Mt Ngauruhoe. We stopped for lunch before continuing on. More of the same followed for the next while of dried up streams and volcanic silt.
 (https://www.trampingnz.com/images/05_central_plateau/rtm21_ngauruhoe.jpg)
Looking towards Mt Ngauruhoe | Photo Credit: Chris Foster
We reached Ohinepango Springs, so we stopped for a bit here, where we went up to the spring and see the water flowing out of the ground. Back to where we dropped off our packs, we all went for a swim in the stream, it was freezing cold, but worth it.
Finally, last bit to Waihohonu Hut, which we got to by mid afternoon. Which is a bit of a change from the last few days. So we just relaxed out on the deck for the rest of the afternoon, including playing card games. Cooked and ate dinner outside before retreating inside the hut to sleep.
Another overcast morning, which was welcomed. Had breakfast, packed packs and on our way back to Whakapapa Village. This is quite an easy track as it is part of the Tongariro Northern Circuit great walk. So today it is up and over Tama Saddle. We were going at quite a good pace, which enabled us to pass some of the other walkers on the track. We had a couple of breaks along the way.
We went via Taranaki Falls, which was our backdrop for our lunch stop. Then we followed the track all the way back to the cars.
Once arrived at the village, we collected the cars and then packed them up for our trip home. First stop on the way home was Tokanau Hot Pools, where we had a relaxing swim. Then we continued up SH1 to Tirau were we stopped for a nice dinner. Continued home to Auckland and got home about 10pm. Great trip.
View Larger Map (https://www.topomap.co.nz/NZTopoMap?v=2&kml=https%3A%2F%2Fwww.trampingnz.com%2Ffiles%2Fmaps%2Fkml_05_round_the_mountain_ruapehu_2021.kml)